
How To Send PDFs to iTunes for iBooks Syncing

This post will explain how to send your PDF docs to iTunes to sync them with your iBooks. It will also allow you to open any PDF document on the web and read it with iBooks. With the method listed below you can send any Doc or even web page to iTunes and read it with iBooks.


How to send PDFs to iTunes for iBooks Syncing.

1. Open iBooks
2. Click on the iTunes icon and select " Make Alias"
3. Drag your newly created Alias and drop it in your home folder.
4. Your Home Folder ==> Library ==> PDF Services (This will ensure that iTunes becomes an option whenever your click on a PDF icon or a print dialog)


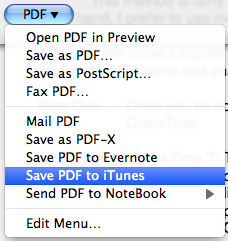
Now when you click print under PDF it's going to ask "iTunes Alias"
You can rename your PDF alias to "Send PDF to iTunes"


Now whenever you have a web page or a document open that you'd like to read in iTunes
Click on File ==> Print ==> Click on the PDF button in the lower left and choose your menu items from iTunes. The document will be saved as a PDF and sent straight to your iBooks.


You can also simply create a folder and then follow the directions above.


[Tip from the Apple Blog]


An original post by

Sociolatte


Comments

Popular posts from this blog

How to Make Money on Facebook in 2026

  How to Make Money on Facebook in 2026 Facebook paid creators nearly $3 billion in 2025. That number went up 35% from the year before. If you've been ignoring Facebook as a place to earn money, it's time to take another look. In 2026, Facebook has more ways to pay creators than ever before — from guaranteed monthly payments for established creators to ad revenue, live tips, subscriptions, and brand deals. This guide covers every method, who qualifies, and exactly how to get started. Method 1: Creator Fast Track — Guaranteed Monthly Pay This is the biggest news in Facebook monetization right now. In March 2026, Facebook launched Creator Fast Track — a program that pays established creators guaranteed monthly income just for posting Reels on Facebook. How much does it pay? $1,000 per month if you have at least 100,000 followers on Instagram, TikTok, or YouTube $3,000 per month if you have more than 1 million followers on any of those platforms Payments are guarant...

How to delete past posts on Facebook

With the new Facebook Timeline comes added features such as your friends ability to see all your past activity, the stuff you might have hidden for so long. Another problem with the new Facebook Timeline is that if you have previous chosen to hide all 'Like' activities. That has been removed and all you 'Like' activity on Facebook shows up on your Timeline. This is a boon for websites like ours. Since the more likes we get the more popular we are going to become. Anyways back to the topic. Now if you have something you can see on your Timeline that you do not want to be  seeing there. You can get rid of it immediately and not have to worry about it again.  How to hide or remove any post from your timeline - maybe an embarrassing photo, video or status update 1. Login to Facebook 2. Click on your name which should bring-up your Facebook Timeline.  3. Hover over the right-hand corner of any post, update, image, video and you should ge...

How to Delete notifications on Facebook

There are three methods to hide, stop or delete notifications on Facebook . You know how annoying it is when notifications keep coming. So here goes. There are many reasons' why Facebook notifications can be quite a pain. This is especially true if you're a gamer and you keep getting game notifications. Also notifications from apps can be quite constant and also make a sound. If you want to turn-off notification sounds - please follow our post here . A 1. On your News Feed choose the notification you want to hide and point the mouse to the right corner. 2. The word 'Hide' appears. Click on it 3. You are asked if you would like to hide your friend or hide to App. 4. Click on hide the App. (Would mostly be Farmville or petville) B 1. On the top right hand corner click on 'Account' 2. Click on 'Account Settings' 3. Click on 'Notifications' 3. On the right you will see a long list of Applications that sends you notifications to turn off the notificat...