Showing posts with label Tips and Tricks. Show all posts

Saturday, January 7, 2012

How to kill all background apps on your iPhone and iPad with one step


Double-tapping on the home button of your iOS device will show you a list of apps running in the background. swipe left or right to see a list of all the apps running. Tapping on any app will close the app. This is a manual process and will take time and effort. You will need to move through all the apps to kill them. If you would rather do this with just a single tap or click, there is an app for that. The app known as 'Process Killer' is available both for the iPhone and iPad. It costs $0.99 and once downloaded will show you all the apps running and how much memory it is consuming. 


How does Process kill work
Once you download and launch the app, you will simply need to pull down the list of process shown and once you release it. All the processes running in the will close automatically one-by-one. This is a really good one step process to save you the headache of stopping each app one at a time. The app will take care of closing all your iOS apps with just a single gesture. 
Process Kill


An original post by

Sociolatte


Tuesday, January 3, 2012

How to download images and videos from Google+


If you have been a regular Google+ user or if you are just starting off, one thing you know is that it is really popular with photographers. You find a whole list of photography enthusiasts on Google+ and it has become one amazing place to find beautiful and stunning photography. There are also videos that are shared everyday and if you go the section 'What's hot on Google+' you are sure to find a trending video over there. There are a lot of great videos and images that are shared on Google+ all the time. So if you want to easily download these images and videos from Google+.

How to download images and videos from Google+


There is now a Chrome extension available that will do the job for you. This handy extension can download videos and images from your Google+ stream. You can download a whole Picasa Album, raw photos and images, YouTube videos with the option to download bulk images all at once. Once the extension is installed you will get a download link on each image and video that you see in your Google+ stream. 


Monday, January 2, 2012

Facebook Timeline Covers


Facebook Timeline is now always in the news and one of the popular features of the new timeline is the cover. This is the large section where you can place a nice cover for your profile and people who visit your Facebook will see this first. This is meant to make a first impression and set the tone for your Timeline. If you do not want to upload and image of yourself or any other cover photo you might have. There are now many websites online that are offering you free covers that you can use. Some of them are funny, others have attitude and some tell the world that you are the king of Facebook. All to add a little bit of spark and creativity to your new Facebook Timeline. After all this is what people see when they first visit you on Facebook. 


How to install, set up or add a Facebook Timeline Covers
1. Login to Facebook
2. Click on 'Add Cover'
3. You can now choose from photos available in your albums or upload a photo.
If you are going to use any of the services mentioned below you would need to select a photo and then follow the process mentioned above to install your new Facebook Cover or banner.


Please find below a lit of websites that offer free Timeline cover images that you can use.
1. A Facebook App that allows you to easily add covers. Once you authorize the app you then have to choose a cover that you like and select it. You will then have to go to your Facebook album and choose the same album and add it as a cover. 
2. Facebookprofilecovers.com allows you to add a cover by selecting an image. Again you will need to go to your photo album titled 'my Facebook cover' to install your cover. 
You can also use the below Facebook pages to search for covers
Facebook Timeline Covers
Timeline Coves
MyFbCovers is also a free service that allows you to use cover images
There you have it, if you think we have missed out a good service that needs to be added to this list. Please do let us know in the comments section below.

Friday, December 30, 2011

CodeTwo Move & Delete Watchdog: Will warm you before you delete or move a file or folder in Outlook


This is Microsoft Outlook App and works within Outlook only. Therefore it cannot be used as a stand alone app. Once you launch Outlook the app is activated and starts to keep a watchful eye whenever you want to delete a file or a folder. It also warns you before you delete a file or folder. This app can be of great help not only to novices who are just starting out with Outlook for for seasoned professionals as well.


How does Code Two Move & Delete Watchdog work.


Images: CodeTwo Watchdog

The way this whole thing is set up is very simple. Each time you drag-and-drop a folder and file you will get s popup asking you to confirm your action. This is helpful because it makes you stop and think about your action and maybe review it. This might be one of those times where you were actually going to drag-and-drop a folder in the wrong place. The same thing happens when you click on delete a file or a folder. The watchdog pops up to tell you that you are about to delete a certain file or a folder. This therefore helps you and saves you a lot of trouble and effort especially when you were about to delete a file or folder that you had previously though to be unimportant. which as it turns out was one that you would have rather have not deleted. Especially important is you have access to public folders.
CodeTwo Move & Delete Watchdog


An original post by

Sociolatte


Wednesday, December 14, 2011

Sign in to Chrome to get your favorite Chrome settings on all your devices


Google Chrome the browser from Google is now the second most popular browser after IE. This browser that brings speed to the internet has been growing in popularity and grows around you. By you people of the internet and followers of Apple know what 'iCloud' is, add an app to one device and in syncs on all your iOS devices. Google Chrome just got smart and you can do the same with your favorite browser. So no matter which PC you log on from, your favorite Apps, Extensions, Bookmarks and other settings are readily available. All this can be set-up with just a click from within your Chrome browser and you're good to go.

How to  Sync your Google Chrome settings across all your devices.
1. Open Google Chrome
2. Click on the wrench icon
3. Click on 'Sign into Chrome'
4. enter email ID and password
5. Clock on 'Ok, Sync everything'
5. You're done

Source: Google Chrome Blog


An original post by

Sociolatte


Friday, December 2, 2011

How to disable or enable all Chrome extensions with a single click


There is a good reason for this post and it is because Google Chrome the web browser from Google has overtaken FireFox in terms of market share internationally. Chrome is also a browser that can do things that other browsers cannot. It is fast and efficient and using Chrome to surf the web feels much lighter and quicker than all other browsers. For example some new Angry Bird levels can only be played on Chrome. So it is now the no. 2 browser behind Microsoft's IE. This can only mean that more and more people are using Chrome and that also means that more and more extensions are being used. Since Chrome has some pretty cool extensions that are totally free and easy to use.


There may be times when you just might want to disable all your extensions and with this extension you can do so in a single click. Disable All Extensions Plus - will help you do just that and you don't have to waste time and search for single extensions to turn-off or stop. This get's the job done in a single click.


It is totally free and easy to use and works everywhere that Chrome does. Will also save you time and you can turn-off extensions while you surf and not bother too much about what extensions are running and what are not.


Disable All Extensions Plus for Chrome


An original post by

Sociolatte


How to check if your Android phone has Carrier IQ


Image: VooDoo Carrier

We have already done a post of how to remove Carrier IQ from your iPhone. If you are wondering what all the noise is about you can read our previous post about the same here. So if you're wondering if your Android phone has Carrier IQ installed and it just might be recording your keystrokes there is now an App to help you out. The App does not remove Carrier IQ but will let you know if CarrierIQ Rootkit is on your phone or not.


Once you install the App on your phone you will get a score if you get 0 it is best as it means that Carrier IQ is not on your device. Anything above that means your phone hosts the CarrierIQ rootkit. VooDoo Carrier IQ Detector will not be able to remove the program from your device but will let you know if your phone hosts Carrier IQ.


Simond the developer has also uploaded the open source code to Github. If this makes you feel a little more comfortable since the program is just about a day old.


VooDoo Carrier IQ Detector


To view a demo and how to use the App on your Android phone check the video out below.


An original post by

Sociolatte


Wednesday, November 30, 2011

How to preview YouTube video ratings before watching


The reason for this extension is very simple it is for those of you who would like to view YouTube video ratings before watching. Most people would like to watch videos with high ratings and there are those that like to watch videos that also have bad ratings. So whatever may be your preference there is a extension available for Chrome, Firefox and Safari that lets you do just that.


How it works: After watching a video on YouTube, you see the list of related videos. Before watching any of these videos you can see their viewer ratings and then decide which videos you would like to watch. There is the like, dislike bar that appears below each video helping you choose which video to watch. This extension has been created by Redditor bmacs


Chrome Version, Firefox version ( Not official), Safari version (Not official). To get the Firefox or Safari version please go to the original post available here


To preview how it works watch the video below


An original post by

Sociolatte


Monday, November 28, 2011

How to disable or turn off Retweets from a particular user on Twitter


Image: Twitter

This post will be a guide on how to turn off or disable retweets from a particular user or follower of yours on Twitter. You might be wondering why you would want to do this. You know how it is when you follow some users and all they ever do is retweet other people's Tweets. This can get quiet monotonous and irritating and you know original Tweets are not going to come from that account and the only thing you will see are Retweets. Fortunately Twitter has the option that allows you to go to that particular account and turn of all Retweets from them. This way your Timeline on Twitter will be free from Retweets from them.


How to disable Retweets on Twitter
1. Login to Twitter
2. Click on the full profile of the person whose Retweets you want to block.
3. You will find a green Retweet icon below their profile picture
4. If you click on it once it turns to grey. ONce it turns to Grey you will no more see Retweets from this person. If you change you mind again and decide that you would like to see this person's Retweet activity. Go back to their full profile and change the button back to green by clicking on it.
5. You're Done


Please leave a comment with your thoughts below.


An original post by

Sociolatte


Sunday, November 27, 2011

How to change your Twitter Username (Handle)


This is very important for businesses, if you are already a Twitter user and you now want to re-brand yourself or your organization. You will need to change your twitter username. When this is done you will need to let all your followers know with a Tweet that you have changed your Twitter username or handle as some users like to call it. 


Something to consider before changing your Twitter Handle. Twitter will let you change your handle very easily and you can do so in 2 easy steps. The only problem is that even though Twitter will update your info immediately  search engines will not. So people who are searching for you via search engines will be directed to a 404 page - page not found. This is something you might want to consider before making the move. if you are not worried about it you can go ahead and change your Twitter handle. If you are concerned then you would like to do this. Change your Twitter handle and then immediately login again and reserve your old username. You can use the same Email ID to create another Twitter account. So use your old handle to tell people who find you through search engines that this account has moved and leave your new Twitter ID for them to find. If you find someone else is already using your desired Twitter handle, this is what you need to do.  


How to change your Twitter Handle or Username

1. Login to Twitter

2. Click on the drop-down arrow next to your username

3. Click on settings

4. Beside Username fil in your new username or Twitter Handle

5. You're done


Please leave a comment below with what you think and your feedback.


An original post by

Sociolatte


How to get your old Yahoo Mail back


Yahoo Mail users who have remained faithful and have not switched over to other mail services might be interested in this option. Yahoo Mail released the new version over a year ago and it is now out of Beta. Users have not been given the option to revert or to use Yahoo Mail Classic. There is however a simple trick to get your old Yahoo Mail back and use the classic version.


How to revert to Yahoo Mail Classic
1. Login to yahoo mail
2. Set your screen resolution to 800x600
3. This will cause the new Yahoo mail to not display correctly
4. You will receive a message 'Return to previous version' Click on it
5. You're done


You can now reset your screen resolution to it's previous settings and carry on with things as normal. All will work find.


Source: Techdows via: Lifehacker


An original post by

Sociolatte


Friday, November 25, 2011

Facebook friending rules


Facebook has its own community guidelines when it comes to adding friends. If you have been adding a number of people and those people have been using the 'Not now' feature there is every possibility that Facebook will put a block on your account. This means there is a limit to the number of requests you can send on Facebook. If however all the request you send get accepted there will be no problem and Facebook will not restrict you account. The problem arises when you send a large number of requests to people who you do not know. This can be a problem because Facebook does have community guidelines and sending a large number of friend request to people you don't know can invite a Facebook restriction on your account.


What to do if you account is restricted on Facebook for sending too many friend invites.
There is really nothing much you can do and all you need to do is wait it out. Facebook does that as they explain to avoid 'User harassment'. Which can be a big problem. So always keep in mind that if you send a large number of friend requests to people you don't know can get your friending activity restricted for a period of time. When that happens you will need to wait for some time before the ability to add friends is restored to your account. 


An original post by

Sociolatte


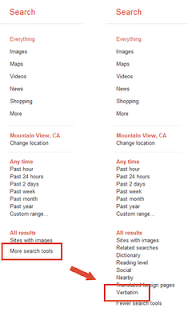
How to search Google, Verbatim


Google have announced a new search feature to their popular search engine. The Ability to search verbatim. What this means is that you can use this option to search for the exact keywords you enter. Google will not auto-correct your search terms but the engine will return results exactly matching your keywords. This comes after Google have done away with the '+' operator saying that less that half of all internet searches used it and that when used, was usually used incorrectly. Google encourages people to use double quotes instead.


Google have said that since removing the + search operator a lot of requests have come in form users, to allow verbatim search. results should be show that exactly match what you enter. This makes a lot of sense because Google is vast and if you don't want the search engine to interfere with your search terms but just show results according to your actual search terms. 


When you use verbatim search the following takes place
making automatic spelling corrections
personalizing your search by using information such as sites you’ve visited before
including synonyms of your search terms (matching “car” when you search [automotive])
finding results that match similar terms to those in your query (finding results related to “floral delivery” when you search [flower shops])
searching for words with the same stem like “running” when you’ve typed [run]
making some of your terms optional, like “circa” in [the scarecrow circa 1963] 


How to access and use verbatim search on Google
Enter a search term 
From the left hand column click on more search tools
Click on verbatim
Results will now show according to the exact search terms you entered

Source: Google Search Blog


An original post by

Sociolatte


Thursday, November 17, 2011

Using your new Google+ page: This is what you need to know


This post is just a word of caution to Google+ users. The reasons for this is to help you avoid silly mistakes that could happen especially if you are operating and running the Google+ business page for your company. The mistake that plagued many Twitter and Facebook uses is this. Accidentally posting personal stuff to your official account, many a person in charge of their companies Twitter account have accidentally posted personal stuff, and potentially harmful and embarrassing stuff on an official account they were managing. 


How does this relate to Google+ pages. This is what you need to know. When you login to your account and start to use your Google+ account as a page. You are no more your personal account but using the service as a page. let's illustrate this further. Drawing an example from Facebook. Now if you login to Facebook and access your Facebook page. Whatever you post to that page you are posting as an admin. What ever updates you do will pertain only to that page. Once you leave that page you are out of it and back to your FB profile. Not so with Google+ pages.


Once you enter the Google+ page mode you are now using the service as the page admin. So once you updated your page, you then need to once more go back to your profile and choose your profile name ot exit the page mode. While in the page editing mode if you start posting to your circles, remember that all posts will point back to your page and not your personal account. This is just a word of caution, especially if you are new to using Google+ pages and just starting of. 


An original post by

Sociolatte


Facebook Subscribers Settings: How to adjust and manage


If you are one of those people who have allowed subscribers, there there are certain settings you would need to be aware of to make you life more comfortable. For those of you who are new to Facebook Subscribe we already have some guide to help you get started.


To know more about Facebook Subscribe please click here
To add a Facebook subscribe button to your profile please click here
To remove the Facebook Subscribe button from your profile please click here

Ok, so if you have the Facebook Subscribe button on your profile and are being followed by people here are a few hints to help manage your subscribers
How to access your Subscribers 'Edit Settings' page
1. Login to Facebook
2. Click on your name which brings up your profile
3. Click on 'Subscribers' found below your photo
4. Click on 'edit settings' which appears on the top right-hand corner

You have the below 4 options to use
1. Subscribers: You can allow or disallow subscribers at anytime by using the drop-down and choosing between on or off.
2. Comments: You can choose to allow anyone to comment or only friends on only friends of friends.
3. Notifications: Decide whose activity you would like to be notified about. This is for your Subscribers only. Choose between everyone, friends of friends and no one. Even though these are people who are following you Facebook will stills end you activity notifications about your subscribers. Use this options to turn if off.
4. Friend Requests: Tick this box to limits only people who are friends of your friends to be able to follow you. 


An original post by

Sociolatte


Wednesday, November 16, 2011

buffer to share your Twitter and Facebook updates in a scheduled manner


You know you stand to loose Twitter followers if you continuously keep posting updates. The same can be said for Facebook too. No one like their news feed or timeline choked with posts from one single users only. If you are a person who loves sharing and cannot resist the urge to share everything you find on the net with your pals, buffer can help you. buffer used to offer only Twitter support but now support from this web app is available for Facebook also. Which includes Facebook pages, so if you need to updated your Facebook pages then buffer can schedule your updates.


This is also a lesson for many a Twitter newbie. How often should you share Tweets? with your fans and followers. The answer is you can share however often you want but ensure that your not Twitter jamming your followers timeline. buffer on the other hand will store all the updates you want to send to people and post them at proper intervals so as to ensure that your feed is updated regularly but not in a manner that is deemed too much.So you this service to schedule your Tweets though the day. buffer can be used anywhere on the web or on your mobile. Analytics are also available for all your posts to measure their impact. 


buffer


An original post by

Sociolatte


Saturday, November 12, 2011

Facebook Name Policy including how to add an alternate name


It seems when it comes to real names and real identities all social networks are fussy about the same thing. In fact Google+ came under a lot of fire because they only allowed people on the network with their real names. Pseudonymous were not allowed, of course it has changed now and some amount of lenience has been allowed. In fact Facebook has the same policy and insists on users actually using their real names. In fact there are a couple of things that are not allowed in names. For example you cannot use symbols, numbers, military titles, offensive words or nicknames in the place of middle names.


In fact you can use your nickname as your first or middle name only if it is a variation of your real name. If however people in the real world know you by your nickname of maiden name there is the provision to add an alternate name. You can have two names and this comes in handy for many people who might have been born with one name but are called something else by their friends and relatives.


How to add an alternate name on Facebook

1. Login to Facebook

2. Click on down arrow next to home

3. Click on Account Settings 

4. Click on 'Edit' beside your name

5. Enter your alternate name

6. Click save changes and you're done.


Source: Facebook help


An original post by

Sociolatte


Thursday, November 3, 2011

Siri: How to change the voice from male to female on the iPhone 4S


In Australia and the US Siri has a female voice but in the UK Siri has a male voice. Now which male would want that, well there might be a few but not most males. This post will help you fix that problem and ensure that your Siri has a female voice and not a male voice. If you want to go the other way around and give Siri a male voice follow the procedure mentioned below in reverse.


How to change British Siri's voice from male to female.

1. Tap on settings

2. Tap general

3. Clicking on Siri will give you a language menu

4. Change it to Australia or the US

5. Siri will now have a female voice


An original post by

Sociolatte


Tuesday, October 25, 2011

Video: Halloween Geek Pranks - possess your coworkers computer and more


This is a fun video from Lifehacker a collection of some of the fun stuff they have come up with for Halloween. Some of these tricks can be used to scare people and bring the Halloween fun on. Video includes how to make fake slime, how to optimize your trick or treating, and make fake blood that looks real. Don't miss the trick on how to make your coworkers think their computer is possessed. One of the simplest tricks we can recommend is this. Will only work if you work close to other people and your computers are close together. Take your coworkers mouse and exchange it with your. Simple swap mouses. Once he or she is back and starts using their mouse. It is not going to work but you start moving it simultaneously. Creates quiet a ruckus in their mind to see their screen arrow moving on its own. So get started on your Halloween tricks and pranks. 


Source: Lifehacker


An original post by

Sociolatte


How to add or remove your current city from your Facebook status updates


This post is for those who share and then discover that the place you are sharing from is also attached to your status updates. This is a simple update and meant for those who suddenly realize that their current site is attached to their Facebook status updates. Alternately once you turn the thing off you can once again add your current city when you want people to see where your're sharing from.


Sometimes you might be on vacation and instead of telling everybody where you are you can simply add your current city and share your updates. Saves you a lot of time. Once you done and back in your hometown you can turn it off again. 


How to add or delete current city or location before you post a Facebook status update.

You would need to remember to either add or remove you current city would need to be done before you post your update. Once an update has been posted you cannot change your city or location after that.


1. Login to Facebook

2. Click on update status

3. Hover near the bottom left of your post and you will find the option to 'Add Current City'

4. You might alsofind that you current city has already been added. To get rid of it you will need to click on the (x) mark that appears as you hover over the name of your current city.

5. Choose your options and you're done


An original post by

Sociolatte